Wednesday, December 09, 2009
Plants growing
It has been three weeks so far and the plants are growing now under neon light in the basement. As you see the chives are doing better than the others. There seems to be one healthy rosemary plant on the right, and few small thyme ones in the middle. It is difficult to predict which one is going to make it and which is not.
Monday, November 30, 2009
Seeds Sprouting
After a few days, the Thyme seeds started to sprout, so they had to be taken out of the greenhouse and put under sunlight to grow. The tiny leaves coming out of the seed are called cotyledons. Soon true leaves will emerge and then the plant will be ready for potting. Once the true leaves appear the plant will no longer have energy stored in the seed as it would all have been consumed by then. Plant food needs to be supplied at this point in the soil to support plant growth. Remember plants need food and light for photosynthesis.
Sunday, November 29, 2009
New Seeds
The picture you see is a small greenhouse that includes three sections of peat pots. The first section has Chives seeds in it, the second has Rosemary seeds, and the third has Thyme seeds. In about ten to twenty days the seeds should germinate and become ready to be moved to a sunny spot for growth. Since there isn't enough sun in the house, usually neon light is needed to accomplish sufficient growth before potting. The final pots should be large enough to enable the plants to flourish and flower. These are useful herbs that one can actually use in the kitchen, so hopefully they will grow as planned. Other herbs that are nice to have include Nasturtiums, oregano, Dills, and Basil. The nice thing about these herbs is that they are perennials, meaning they produce every year without the need to plant new seeds. Another nice thing about them is that they can be grown in pots if they are big enough. The main challenge is finding a sunny enough spot in the house, otherwise even the pots will need to be placed outside.
Sunday, October 18, 2009
Midway to Black Gold
After about three weeks from the start here is how the compost pile looks now. I think it will be ready after two weeks. The original pile has been continuously turned once every two or three days since the beginning. This is necessary to keep the reaction going and to aerate the pile. Also, the layers needed to stay wet, but not too wet. I had to add water every two or three days as needed. Notice that the pile is now less than half the volume of what it used to be three weeks ago, so I added more brown leaves and grass clippings to fill the bin again. That is OK because the first batch is going to be ready in a couple of weeks at the bottom while the new batch can continue to rot. The new pile can also be ready before winter, and if not then it will be ready in spring. The picture of the finished compost (humus) will be posted in a couple of weeks (hopefully).
Saturday, September 26, 2009
Making Black Gold
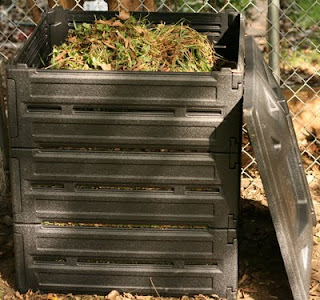
No I am not talking about petrol. If you live in Iowa then black gold refers to this dirt that you make by composting. Fall is the best time to compost. We gather the dead brown leaves and grass clippings from the backyard and we put them in the compost bin shown in the picture so that they rotten and become black gold. Black gold is the dark soil that results from this chemical reaction. It is very rich in nutrients for the plants and the lawn.
Be careful not to add weeds because they don't die, nor rotten. Add brown leaves, grass clippings, pieces of dead wood, straw, fruit and vegetable peelings from the kitchen, and even paper and card board. Don't add animal feces, meat, bones or grease. These cause bad smell and can attract flies and other bugs.
The chemical reaction that results from the wet compost causes the mix to heat up to 130 F and it starts to rotten making the black gold. To accelerate the process it is best to turn the mixture every two to three days and make sure it stays wet. When done properly the soil will be ready in one month typically.
It is a very simple process that not only provides precious nutrients for the garden plants and lawn, but also reduces waste going to the landfill and saves the environment.
I believe in recycling and keeping the environment clean, don't you?
Saturday, August 15, 2009
More on Cedar Valley Nature Trail
Since I recovered from my bike accident and I have been biking on the Cedar Valley Nature Trail almost daily. My accident caused me to become leery of trails in general, being afraid of having another mishap which would not be good especially at my age, you know too many concussions can lead to some serious head injury eventually. Anyway, I thought how could I protect myself better than I used to. Well how about wearing some protective eyewear so that you don't have to leave the handle bar each time a bug hits you in the eye ... or how about not braking suddenly while looking backwards, da! Well anyway, I got bored of treading the same section of the trail each time, which is from Hiawatha to Center Point (13 miles) . This time I decided to carry my bike in the car, and ride to Brandon so that I could bike from there to La Porte City, some 10 miles each way.
I carried my bike to Brandon, which took about 35 minutes driving on the highway. It took a few minutes to find the trail there, and then some more minutes to find a place to park the car, and off I went on my bike towards La Porte. I kind of lost direction and was not sure if I was going in the right direction or if I was going south to Urbana instead. My confusion did not last long because after about two miles along the road I found that the trail was closed in that direction, so I was forced to go to the other direction. Now the sun was in front of me which indicated I was going south to Urbana. That meant I was going to La Porte the first time. I did reach Urbana from Center Point before but never went past it, so it was still a new section of the trail for me to go from Brandon to Urbana (about 9 miles). The trail in that section was a little different from the sections I was used to. Here the trail is less trodden as evident from the heavy vegetation on it with two narrow paths on either side about the width of a mountain bike tire. It was kind of hard staying on that narrow path, and I was kind of afraid I might fall if I got out of the narrow path to the untrodden terrain. On one occasion I hit a deep hole that sent my bike and I flying high up, but fortunately nothing bad happened other than some rear ache due to impact with the saddle. After about four miles the trail turned into more familiar gravel path wide enough to make the ride easier and more comfortable. After a while I passed a bridge over a small river, then some open fields with cows grazing in them. I crossed some rural roads along the way to Urbana. I was making one mile about every five minutes. At Urbana I ate a small snack that I carried with me, then headed back. Overall the ride was nice and different than before. At least I tried a different section of the trail than what I used to before. Too bad I did not make it to la Porte, but riding between Brandon and Urbana was not bad at all.
I am looking forward to riding on the rest of the trail which is about 52 miles long, one section at a time.
Wednesday, July 08, 2009
Bike Accident
It happened on the Cedar Valley trail last Sunday (July 5th). I remember biking all the way from home to Center Point (at 13 miles north of Hiawatha). I rested there and ate some dates and drank the water I had. I filled my bottle and used the restroom there and then went on my way back home. I remember all went well, and I must have reached the last three miles to Hiawatha, because that is where the dirt road turns into asphalt. Somewhere there I had a blackout, total blackout. I don't remember what happened after that. They told me at home that I rang the door bell, and my bike was there next to me. I told them I had an accident and that I needed to go to the hospital. I don't remember any of that, but they took me to the hospital and they did a cat scan on me and then did some stitching under my left eye, under my nose and lip. I also had a long gash in my leg that was stitched as well. They said after we came back home that I was awake and talking all the time, mainly asking the same questions over and over. I went to bed but they said I kept waking up and asking the same questions again, like: what kind of bike I have, is it a black Connandale? F9 series? They said yes, and I asked again: Did we just come back from vacation in Egypt? Yes. Where do I work? Who is my boss, etc.
My consciousness came back to me some time at night, as I woke up and went to the bathroom and noticed my messed up face in the mirror. I asked a few more questions and slept until the morning. I fully realized what happened in the morning. I sent email to my work telling them what happened and that I was not coming for at least a few days. I took my pain killers and then took a shower. I felt the Tetanus shot in my left shoulder hurting a bit, but the worst thing was the burning sensation in my left eye. The eye itself was not injured, but I had stitches above and below it, and the lid was kind of sagging. Other than that I felt OK.
I am still trying to remember what happened. They say I must have had the accident close to where I live, because it seemed that I walked back home. I don't think so. I think somebody gave me a ride. I vaguely remember as in a dream somebody asking about my ID and me telling them my address. I remembered my address, and I think whoever brought me home had a GPS and also a bike rack. They must have dropped me at home and left.
Where exactly I had the accident or what was the nature of it I have no idea. I don't remember at all. Did a car hit me? The bike has no sign of any dents or scratches, so that excludes the car accident theory. Did I sleep while I was riding my bike and I fell? Did I brake suddenly and flew off the bike? I can't just remember what happened at all. I vaguely remember me stopping to eat some berries along the way. Or as if I missed the berries tree and when I realized I passed by it I braked suddenly which caused me to fly off the bike. I think that is what happened.
I hope that my memory will come back to me so that I remember what happened exactly. I just need to know. It is a period of a few hours that are totally wiped out from my memory and I want that memory back. I want to know what happened. I am lucky that I did not have a more serious injury, thanks to wearing a helmet. Imagine what could have happened if I did not wear the helmet. Wow! Its feels like a dream, except that my messed up face is a cruel reminder that it all happened for real.
Tuesday, May 05, 2009
Improved Passport Photos
As a follow up on my previous blog, I did some improvement on the technique I described of taking passport photos at home. There were two problems with the photos in the previous article. First the resolution was low, and second the background was not quite white due to shadow in the background. To fix the first problem, I made the following modification: Instead of scaling down the image as I described before, re-size the print size of the image. The new image print size should be reduced until the dimension from the bottom of the chin to the top of the head is about 1.05 inch. The rest of the steps are the same.
As for the background problem, make sure that the person stands about one to two foot away from the wall to avoid any shadows.
After the pictures are arranged on a 7x5 inch page, use the image adjustment tools to adjust the colors as needed. For example you can lighten the background to make it closer to white than the original photo by using the Curves tool.
The resulting photo should be much better than what I described before. Try it.
Sunday, April 05, 2009
Passport Photos at Home
You can take your own passport photos at home and print them at any photo print shop such as Walmart or Sam's Club. Refer to the photo guidelines in your country. In the US the passport photo needs to be 2"x2" with the face looking straight at the camera with a white background, and the distance between the chin and top of head needs to be between 1 to 1.3 inch. Here is how you can take your own passport photos at home:
First make the person stand in front of a white wall, and have two lamps shining at the face as shown in the picture below. Make sure that no shadows show on the white wall and that the lighting is adequate.
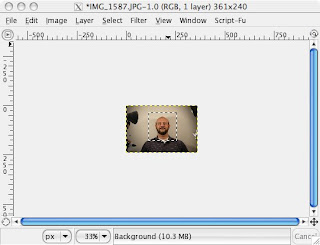
Then open the picture in a program like PhotoShop or the free Gimp software (www.gimp.com). In PhotoShop or Gimp measure the distance between the chin to the top of the head with the measuring tool. In my case the distance in inches was about 7". In order to scale this distance down to about 1.1" I scaled the image by a factor of about 1/7. The new scaled image in shown in the picture below. When I measured the distance between the chin to the top of the head I read about 1.1". Perfect!
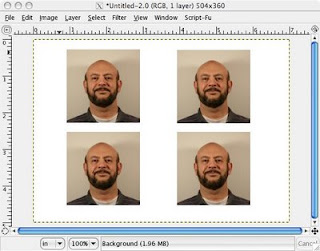
Now select a window of exactly 2"x2" with the select tool as shown in the picture above, and copy into a new frame that has the dimensions 7"x5" which is the size of the picture you will print at the print shop. Make an array of that cropped photo in the 7"x5" frame as shown in the picture below.
Finally print that picture in a print shop such as Walmart or Sam's Club using a 7"x5" size prints and you will get four passport size photos in each print. The photo dimensions will be exactly 2"x2" and the distance between the chin to the top of the head will be about 1.1". All you have to do after that is cut the four photos in each print and there you have them, cheap and clean.
Tuesday, March 24, 2009
Mobility
There was a time when high quality audio systems were big, I mean big in size: High power audio amplifier to reproduce the sound transients with high fidelity, large speakers with deep woofers to better generate the bass notes, an equalizer to compensate for any distorted frequency components, and of course a low noise receiver for high fidelity reception of the FM radio waves. The whole system occupied a good portion of any room and you had to strategically sit in front of the speakers to receive the best sound waves for a pleasant stereo experience. That was up to the late eighties maybe, but since then audio systems have been shrinking in size and quality. Today it seems that the speaker has disappeared altogether and is replaced by the earphones. A teenager nowadays would often share his/her earphone with a peer to listen to the same iPod, and what kind of sound quality would you expect with the earphone in one of your ears and the other half of it in someone else's ear? It seems that quality is no longer important, and has been replaced by style or trend, it has been replaced by mobility.
Same goes for high quality video, now replaced with mobile tiny screen devices, telephones replaced with cell phones, and nice desktop stations replaced with tiny little laptops. It is the age of mobility, the world has become a small village, and it does not matter where you are anymore, everything is mobile, and this is the trait of this century. Is this better than how things used to be? There is definitely an advantage of being mobile, but to lose quality for the sake of mobility seems to be a drawback. Don't you agree?
Sunday, February 22, 2009
Automatic Blood Pressure Monitors
You might have thought of owning one of those automatic blood pressure monitors to conveniently take readings of your blood pressure at home. It is nice to have such a device at home so that you don't have to wait till you see your doctor just to know what your blood pressure is. That is why I bought one of those small compact automatic monitors. The one I bought was a generic, relatively cheap monitor ($50 or so), and it is easy to use. Just wrap the cuff around your arm, press the button and it pumps air into the cuff and displays your diastolic and systolic pressures on the LCD screen.
I used my monitor for over a year and was happy to see my blood pressure close to 120/80. However, I was not sure how accurate those readings were, especially when I found discrepancies between the readings I got at home and readings I got elsewhere. I am not talking big discrepancies, only a few points. I wanted to know how accurate were the readings I took at home, because although I knew that blood pressure varied all over the place within minutes, I also knew that there was a big difference between 126/76 and say 134/84. All I wanted to know was the accuracy window of my monitor. I surfed the internet looking for how accurate those monitors were but I did not find the information I was looking for. I found warnings about the necessity of calibrating the monitor periodically to ensure accurate readings, but of course you couldn't calibrate it yourself, you had to send it to a special lab to do that for you, for a fee of course. I was frustrated about all this, and was coming to the conclusion that the only accurate blood pressure reading was the manual one where the nurse had to listen to the turbulence in your blood with a stethoscope while pumping air into the cuff.
Lately, I found a brand called Omron that had a reputation of being accurate, so I bought one the other day. The specifications sheet inside the box said it was calibrated to be accurate within 2% of the actual pressure. Now that was impressive. I tried it instantly, and I got a reading of 126/76 the first time I used it. Within minutes, I used my old generic monitor to compare the two, and I got a reading of 134/84. OK, so which one could I believe now. Then after a few more attempts, it occurred to me that in order to have a fair comparison I had to have the same position in both measurements. Reading the booklet that came with the Omron monitor it said to sit on a chair and lay your arm on a table so that it was about the same level as your heart, and to keep your feet flat on the floor. So I sat in that position and used my old monitor again. I got a reading of 127/76. Then I used the Omron monitor in that same setting and I got 126/76! Bingo! Almost exactly the same reading. I made two more measurements with each monitor in that position and I got similar readings again. I was thrilled. This meant that what was important was the position in which you measured your blood pressure not the monitor itself. It seemed that both monitors read the same pressure when the conditions were similar. To make sure that was the case I tried both monitors again the next morning, and again I got very similar readings. So I returned the new expensive Omron monitor and decided to continue using my old one. All I had to do was to make sure that each time I used it I sat in that position on the table, laying my arm at the same level as my heart, and keeping my feet flat on the floor. That position always gave a consistent accurate measurement of my blood pressure.
So now I know that I have a means of telling within reasonable accuracy what my blood pressure is at the convenience of my home.
Sunday, February 08, 2009
Home Gym
Here is my experience with home gym equipment. I don't have time to join a gym for regular exercise so I made my own home gym. I equipped my basement with free weights, which consist of a barbell and dumbells with 200 pounds of various size plates, together with a good bench. The bench is sturdy enough to take 300 pounds of weights and has multiple settings for flat, incline and decline positions. For cardio routines I bought a good quality treadmill and an elliptical machine that emulates staircase climbing but the foot actually never leaves the paddle to eliminate any impact on knees or ankle joints.
I have tried some supplements advertised in the market that promised more energy and fast recovery after intensive exercises. First I took Hydroxycut and then N.O. XPLODE, and have decided not to use them anymore because they were not as effective as adverstised and they had side effects. Main side effect for me was the caffeine (more than 200 mg in each serving). Another side effect was stomach cramps when doing situps. I also tried Creatine and found that it caused me bloating probably due to liquid retention in the body. So I stopped that too. The only thing I take now is whey protein only after the exercise. I haven't found any side effects for whey protein so far.
The best exercises I found are: squats, deadlifts and bench presses of various kinds. In addition to that I add some isolation routines like curls and leg extensions.
I also like pushups, situps and pullups. Pushups don't need any equipment, although I found that the so called "Perfect Pushups" help provide more challenging pushups than the bare ones.
The pullup door bar that is advertised in TV works great and can be found at Walmart for less than $30. It is great for the lats, chest and shoulders, as well as the abs.
Usually each exercise takes no more than 45 minutes, and when done every other day it provides a great means to stay active making up for the sedentary office daily rouitne.
In short, I don't need to waste time going to a gym when I can do fine at home. Of course this might not work for a professional bodybuilder, but it works fine for a family man with a busy schedule like me. Don't you agree?
Subscribe to:
Posts (Atom)